Bringing “Quality is Paramount” for Gen1 Dataflows
Continuing from Part 33, where I introduced the polling method for implementing version control in Power BI dataflows, let’s talk about testing.
Now, if you are following a Medallion Architecture approach, you SHOULD be able to test both the inputs and outputs of your dataflows. This testing is critical to validating each step of the data journey. Testing serves as the safety net for your teams from making regression errors and helps you identify issues before your customers do, both risks that teams should vehemently avoid. However, as of October 2023, Microsoft still doesn’t provide native data testing tools. As I described in How DataOps is woven into Microsoft Fabric, these capabilities are maturing but not ready for production use while in preview.
Therefore, when Luke Barker and I had only Gen 1 Dataflows available to our projects, we had to get creative. As seasoned data practitioners, we knew we needed to be able to:
1) Build tests that evaluate the schema of the dataflow outputs - It is very easy to remove a step in the Power Query editor that casts a column to a specific type (e.g., whole number, date), which can inadvertently introduce problems downstream. In addition, upon saving a dataflow, if Power BI encounters an ambiguous column (e.g., ABC123 columns), it casts that column to a string, removing any errors. This fun “feature” may magically remove rows of data. We needed to be able to inspect the schema of a dataflow table and make sure it matched our expectations.
2) Build tests that evaluate the content of the dataflow outputs - If you’re not using Bring Your Own Storage (BYOS) or can’t (looking at you, GCC), obtaining the contents of a dataflow table and inspecting for anomalies is not easy. The data is stored in CSV files behind some gated Microsoft service, so the only way to access that data is via a Power BI dataset.
3) Build and run tests locally - Good testing systems allow staff to run tests independently from one another and store the tests in version control. That way, it’s easy to share tests with teams, and tests can be developed and tested (i.e., testing the tests) locally. Ultimately, this capability allows teams to create a suite of tests and set up the safety net needed.
4) Keep it Simple – Microsoft doesn’t always make this easy, but we didn’t want to have to maintain lots of components or scripts just to run some tests. The overhead of testing should not impede the delivery of new features on our projects.
The UnPivoted Testing Approach
After some research, we settled on a Dataflow Testing Dataset concept that would sit in the same workspace as the dataflow. This dataset would exist for each team member who needed to write and execute tests. Most importantly, this dataset could connect to any dataflow and pull the contents for testing.
How do you do that? Well, I’m glad you asked. It works this way:
The Parameters - The dataset has a parameter for the Workspace (Workspace_ID) and Dataflow (Dataflow_ID) so it knows which dataflow to import. We also needed a randomly generated GUID to represent the instance for test execution (Run_ID). This allows us to track when a suite of tests is executed and their results.
The Tables - The dataset has two tables. The first and largest is called DFTest. It functions as an unpivoted representation of each table in the dataflow. Figure 1 illustrates the approach. This technique avoids running into schema refresh errors in a dataset when switching between dataflows and standardizes the format. Yes, it does drastically increase the number of rows, but if I’m testing more than 10 million rows of data in development, I should be parameterizing my dataflows to keep the size more manageable during development.

Figure 1 - Switching between dataflow sources dynamically allows us to have one testing dataset.
The second table is RowCount, which contains the total row contents for each table in the dataflow. If you have ever saved a dataflow and forgot to refresh, then you know that you could easily have zero rows of data and not know why. This table makes it easy to test for that oversight.
Local Testing
With the dataset ready to serve our testing needs, we bring in our good ol’ friend Pester 4 and build Gherkin tests. These tests are housed in the same repository that tracks dataflow changes via the polling method. Gherkin is an implementation of the Behavior Driven Development approach that emphasizes building tests in plain language and executing those tests with scripts. That way, you have a set of syntax and semantics to set expectations for the test setup and the tests conducted. Each test is described as a feature file with a Background section that validates the environment to conduct the test and then the Scenario that executes those tests.

Figure 2 - Example Background Section of a Gherkin test.
In more detail, the Background section executes a shared script (Test-Support.ps1), which interfaces with the Dataflow Testing Dataset as illustrated in Figure 3. This process works as described line by line for each sentence of the test:
Given “that we have access to the DFTest file in the Workspace: ‘{Workspace}’”
This test verifies that the workspace is accessible, and the appropriate testing dataset exists in the workspace.
And “we have access to the Dataflow: ‘DataflowName’”
This test verifies that the dataflow exists and extracts the contents of the dataflow (as JSON).
And “we have the table called ‘Table’”
This test verifies that the table exists in the dataflow (and wasn’t renamed for some reason).
And “we can setup the table for testing”
This is the most critical step in testing because this test:
- Updates the parameters of the testing dataset to point to the appropriate workspace and dataflow.
- Issues a synchronous dataset refresh and tests if the dataset successfully refreshes. This refresh request forces the dataset to detect the new parameters.
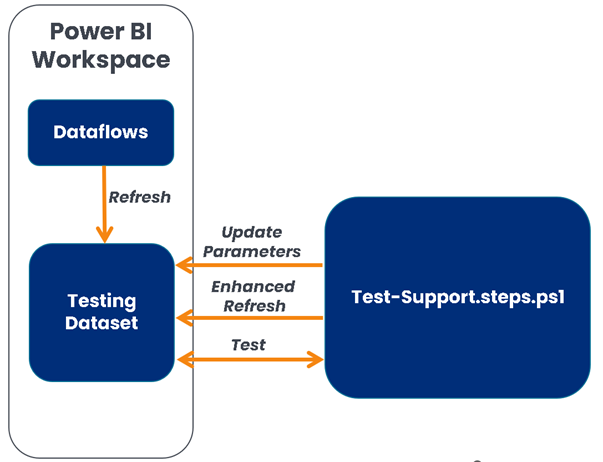
Figure 3 - Testing process illustrated.
With the background validated for testing, we then can execute simple schema and content tests. The following are the ones I use often:
Schema Tests
Then “it should {Contain or Match} the schema defined as follows:”
This test accepts a table of information with the columns Name, Type, and Format, such as:
| Name | Type | Format |
|---|---|---|
| Alignment ID | int64 | 0 |
Name: This is the column name.
Type: This is the column type.
Format: This is the column format. You can leave this blank if the format does not need to be tested.
This test accepts a parameter {Contain or Match}. If the parameter entered is “Contain,” then this test will make sure each column exists and matches the type and format. If the parameter entered is “Match,” then this test will ensure the table has all the columns defined in the test, that each column exists, and that each column matches the type and format. The “Match” value is strict so that no new columns exist in the dataset compared to the defined table in the feature file.
Content Tests
And ‘the values of “{ColumnName}” matches this regex: “{Regex}”’
This test accepts the {ColumnName} parameter and {Regex} parameter. This verifies that the column in the table passes the regular expression. The Regular Expression format follows the .Net Regular Expressions format.
And “the values in ‘{ColumnName}’ are unique’”
This test accepts the {ColumnName} parameter and validates that are values in that column are unique.
And “there should be {Comparison} than {Count} records returned”
This test accepts the {Comparison} parameter and {Count} parameter. The {Comparison} parameter can be the following values:
- exactly
- less than
- less than or equal to
- greater than
- greater than or equal to
The {Count} parameter should be a number.
This test makes sure the number of records in the table meets expectations. This is a good test to monitor for empty tables and residual test filters.
And “all tests should pass for the DAX query: {Test File}”
This test accepts the {Test File} parameter. The {Test File} parameter is the name of the Data Analysis Expressions (DAX) file in the dataflows folder.
This test executes the DAX query against the test dataset and inspects the test results returned from the DAX Query.
The DAX query needs to output the following schema:
| Test | Expected Value | Actual Value | Passed |
|---|---|---|---|
| Text describing the test. | The expected value in the appropriate format (e.g., number, boolean) | The actual value of the DAX calculation. | A boolean indicated true if the test passed. Otherwise, the value is false. |
Generating Tests
Now, to keep it simple, two PowerShell scripts aid in testing. The first script, Generate-DFTests.ps1, builds a feature file based on a template for testing a dataflow (see Figure 4).

Figure 4 - Example of generating a test.
The second script, Run-DFtests.ps1, runs the tests based on which dataflow you wish to test and displays the results (see Figure 5).

Figure 5 - Example of running the tests for dataflows.
In the end, the folder structure for our dataflow versions and tests follows the pattern in Figure 6. Each dataflow gets its own folder, and tests are kept in a sub-folder called CI/{Workspace ID}. {Workspace ID} is the Globally Unique Identifier (GUID) representing the Power BI workspace that stores the dataflow.
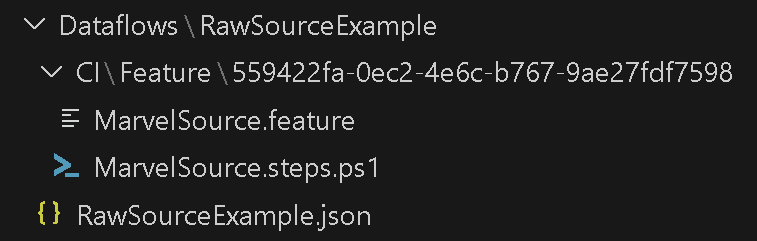
Figure 6 - Pattern for storing versions of Power BI dataflows and tests.
All right, that seems like a lot to go over, but when you get past the initial setup, maintaining the tests and executing them is fairly quick. In fact, thanks to ChatGPT, generating the Regex expression to test the contents of a column is much easier than it was two years ago.
This method has extended my teams’ safety net way past testing datasets. Now, we can test dataflows when Bring Your Own Storage and/or Fabric is not an option.
Try It For Yourself
To try this approach, please visit the template GitHub repository for an installation script to create a Power BI workspace and an Azure DevOps project. This script will set up the workspace and project. Then, all you need to do is follow the instructions for uploading the Dataflow Testing Dataset to the workspace and get to testing!
If you’ll be at EduCon 365 Chicago, please stop by my session on November 2nd, where I go in-depth on dataflow version control and testing.
Can you guess what my next article will be on? As always, let me know what you think on LinkedIn or Twitter (having a hard time calling it X)
This article was edited by my colleague and senior technical writer, Kiley Williams Garrett.