DataOps Principle #10: Orchestrate
Let’s Orchestrate… If you have read Part 3 and Part 4 of this series, you’ve probably noticed that I was building towards something. By combining the best practices in version control and the best practices in testing, you can start to automate the building and testing of Power BI reports/datasets. That means your team can avoid putting errors in production, test if refreshes work, and manage how a report gets into a Power BI Workspace. Everything I discuss in this entry will be made available on GitHub. I followed the “Make it Reproducible” principle so I scripted out much of the steps using PowerShell and Azure CLI. My hope is you can use this as a template for your projects.
The beginning-to-end orchestration of data, tools, code, environments, and the analytic teams work is a key driver of analytic success.
If I was to offer a theme around this principle it would be: Continuous Integration (CI). Keep in mind that DataOps includes DevOps principles, so my definition of CI within Power BI is the practice of automating the integration of code changes from multiple contributors into a Power BI workspace. CI typically consists of 4 workflows, and to provide better context, the following is my commentary on how we map them to Power BI:
1) Run tests locally – This workflow is on the “honor system” where a developer follows best practices from Part 4 of the series.
2) Compile code in CI – For many development environments this is implemented using a build agent, a virtual machine/container that compiles the code and fails if the build fails. The idea here is the build agent standardizes the build to ensure the build succeeds and the later steps can be completed. With Power BI, I would consider the build agent a Build workspace, a temporary workspace in the Power BI service where we can test refreshes before it’s placed in a Development workspace shared by everyone on the development team. If you work in the high-code side this may feel unusual, but on the low-code side this is becoming common place. The other parts of the Power Platform (PowerApps and Power Automate) have introduced environments and Zachary Johnson has written about using environments in PowerApps for CI.
3) Run tests in CI – Using Azure DevOps and PowerShell we take the recently refreshed Power BI report in the Build workspace and run through all the tests (see Part 4) using XMLA. It’s critical we use at least Power BI Premium Per User in order to have access to XMLA.
4) Deploy an artifact from CI – If the compilation (a.k.a. refresh) and tests complete, the Power BI dataset is ready to move to the Development workspace.
Putting Theory to Practice
Alright enough definitions and theory, you probably want to know how it all works. Here is the workflow:
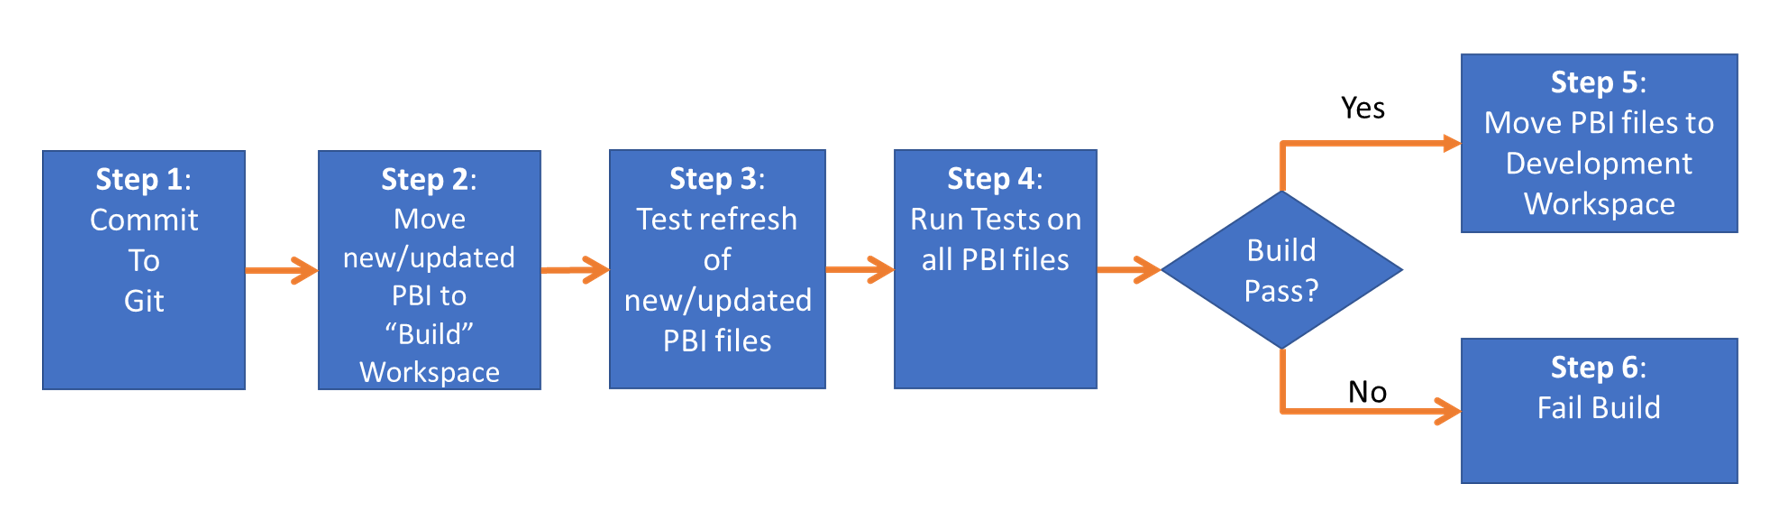 The Steps for a CI pipeline
Step 1 – Sounds simple, but let me take the opportunity to define the folder structure for the code
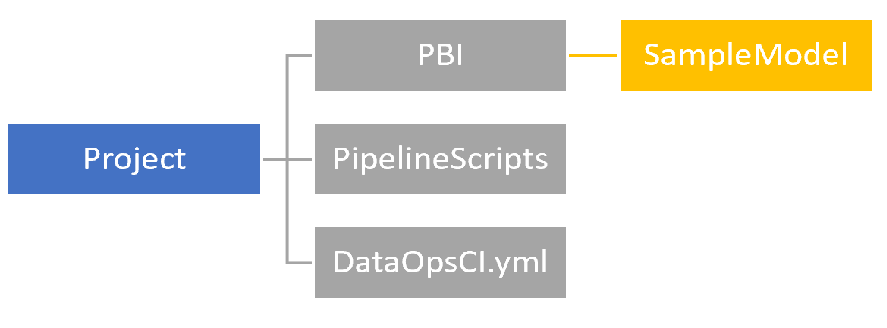
The folder structure for a Power BI project
Let’s look at the main folders:
PBI – Within its own subfolder, this is where you would store a .pbix file and its tests (.dax and .msdax). In the image above, SampleModel.pbix file and 3 test files would be stored in the SampleModel subfolder.
PipelineScripts – These files inform how the orchestration happens and Steps 2-6 are automated.
DataOpsCI.yml – The YAML file that guides the orchestration and contains important environmental variables.
Step 2 – The automated scripts identifies any new or changed .pbix files and publishes to the Build workspace using a service account with a Power BI Premium Per User (PPU) license.
Step 3 – Any new or changed .pbix files are refreshed (if they are a dataset). NOTE: The first time a new file is placed in the Build workspace, the refresh will fail. You have to “prime” the pipeline and set the data source credentials manually. As of August 2020, this is not fully automatable and the Power BI team at Microsoft have recently written about it. My instructions on GitHub call this out as well.
Step 4 – Any tests sitting in the same folder as each .pbix file are ran against the .pbix file in the Build Workspace using XMLA (which is why a service account with PPU is needed). Please note that regardless of if the .pbix file is new, changed, or unchanged, tests are executed. Failed tests are logged to Azure DevOps and the build will fail.
Step 5 – If a .pbix file has all the tests pass, then the .pbix file is moved to the Development workspace.
Step 6 – If step 4 for a .pbix file has resulted with a failed test, then the build will fail and the Development workspace will not be updated.
The scripts I have shared on GitHub utilizes Azure DevOps for version control and CI. If you’re a GitHub Actions user, it probably won’t be that difficult to convert and if you’re interested in writing instructions about implementing this with GitHub Actions, message me on LinkedIn or Twitter.
You’re probably wondering why I left out Test and Production workspaces… well just like I did with Part 3 and Part 4, there is some additional best practices I want to share before completing the whole picture (yep the teaser for you to keep coming back to this blog).